Key Takeaways
- Foil tube method: Wrap foil around the filament ends and heat with a soldering iron. Push the ends together and let them cool.
- Fusing tool method: Print or buy a fusing tool with a PTFE tube. Insert the filament ends into the tool and heat with a soldering iron. Trim and sand the fused area.
- Aluminum block method: Drill holes in an aluminum block to clamp the filament ends. Heat the block with a soldering iron and let the filament fuse. Remove the block and smooth the joint.
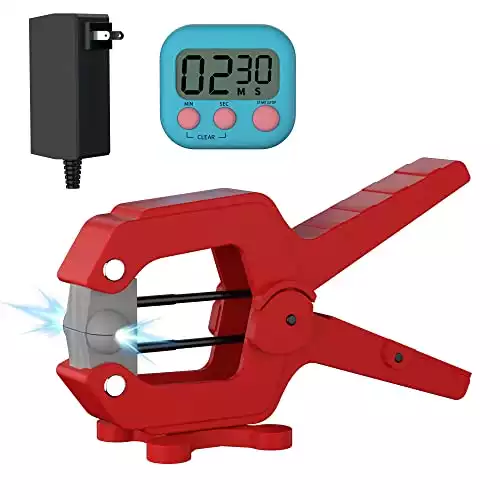
- Electronic splicer method: Buy a pre-made splicer that has a clamp, a heater, and a timer. Insert the filament ends into the splicer and turn it on. Wait for the recommended time and turn it off. Release the clamp and peel off the tubing.
How many times have you finished a 3D print, and the leftover filament on the spool isn’t quite enough to complete your next print?
Or worse – you finished a roll mid-print (the print then stops) and you’ve wasted all that filament and had to start again?
Well, you can avoid this frustration by learning to seamlessly join your spare filament together!
In this article, I’ll cover my top methods for filament fusion – and share my tips to prevent any jams and inconsistencies that could arise if you’re not careful.
We’re also going to cover how to build your own rudimentary 3D printer filament joiner, as well as some pre-built options which you can use to splice nearly any 3D printer filament together.
How to Join 3D Printer Filament Together
- Heating Foil – The Simplest Way to Splice Filament
- Using a Fusing Block – A Compromise Between Strength and Equipment
- Welding Filament – The Strongest Fusing Available
Things to Remember Before Trying to Fuse Filament
Regardless of your reasons for learning how to fuse pieces of filament together, there are the things you need to note beforehand:
- Never attempt to fuse different materials together, even if they have similar melting points. This could end in disaster for many reasons.
- Never attempt to fuse different brands of filament together. Two different brands of PLA may look the same, but as above – the melting points and makeup of the two brands can differ. Again this could cause jams in your extruder, or the joined lengths of filament to break apart and clog your extruding motor.
- Regardless of what anyone says – don’t heat your filament for fusing with an open flame. You won’t know what temperature you’re using, and you could either not get a good enough bond, or you could even burn or boil the filament. For best results, you’re going to want to use an adjustable temperature soldering iron or another accurate heat source.
- Make sure you cut each end of the filament cleanly before joining. This isn’t completely necessary, but it will make the join easier and stronger.
My Top Hacks for Splicing Filament
The Ultra-Simple Way to Splice Filament
Here’s the simplest method by Xabbax on the Reprap forums. If you’re looking for a quick answer to how to fuse PLA filament, this could be it. It’s probably the simplest 3D printer filament joiner.

- Roll tin foil closely around the filament to form a tight-fitting metal tube. Here a triangle piece is used so that it can better stand the heat in the middle.
- Push each end into the foil tube, and heat with a temperature-controlled heating element or adjustable soldering iron to around 180°C for PLA or 250°C for ABS. These are guide temperatures only, the filament you have could differ greatly.
- Once hot enough, while still gently pushing together you should feel the filament melt and fuse together. Once done, leave to cool for a few minutes and remove from the foil tube. There you have it – a simple filament fuser!
A More Reliable Way to Fuse Filament

If you’re finding that a bit fiddly, this method might be a bit easier to manage.
You’ll have to print the splicer tool itself (or buy a pre-made 3D printed one), but it will give you better guidance if you’re not able to wrap foil around the filament (if the filament has a tight coil for example). This method could provide a more reliable way of joining filament compared to the foil method above.
Note: With this example it’s likely you’ll need to shave off the bulge created from the join afterwards.
You can check out this handy, very quick-to-make tool here on Thingiverse.
- 3D print the fusing tool per the instructions of Thingiverse (20% infill, 0.2 mm layer height minimum.
- Slot a cut of PTFE tubing into the hole on the tool, cutting it flush with the tool.
- Insert the filament into the top portion of the tool where the PTFE tubing is installed, and position it so that there’s roughly 2 mm of filament exposed. Adjust the outside screw to hold it in place. Repeat the same for the second piece of filament you want to fuse to the first. Aim to have it stick out roughly 5 mm. Again, secure it with the screw.
- Fire up a variable temperature soldering iron and let it heat up to 180 degrees.
- Touch both filament ends to heat them up.
- Clamp the tool together to fuse the two filament ends.
- Let the filament cool down.
- Trim off any excess filament around the fusing point with a cutter blade or scalpel then use sandpaper to smooth down the area to match the diameter of the filament.
Alternatively, you can cheap a pre-made filament joiner tool like this one on eBay. The method here welds the filament by heating one end then guiding it through a fusing block where it meets the other filament end.
- Feed filament through the fusing tool and PTFE tubing with roughly 20 mm of filament exposed on the other side.
- Use a variable temperature soldering iron (or other temperature-controlled heat source) set to 180°C (for PLA – adjust as required for different filament types) and heat up the filament end.
- Pull it back into the PTFE tubing, then insert the other piece of filament so that it touches the heated filament inside the tube.
- Push both pieces together firmly for around a minute to allow them to fuse, bond, and cool.
- Remove the PTFE tubing with the fused filament inside from the block, then gently peel off the tubing.
- Secure the filament in the gap at the top of the tool using the screw.
- Use a scalpel or cutter blade to shave off any excess filament and thing down any bulges.
- Sandpaper the fusing point to match the diameter of the filament.
Welding Your Filament for Best Results

The last tool to splice your filaments together takes a little more preparation, but should yield the most reliable results. It’s produced by RichRap – you can see the details for his tool here.
It uses an aluminum block that’s drilled out to form a clamp to seal around the ends of the filament. The block is then heated up as above, with a temperature-controlled heat source.
Richard seems to have gotten the best results from this. It’s well worth a read.
Purpose-Built Tools
If you’d rather avoid the DIY route and want a filament fusing option that’s more reliable, then purpose-built tools are a solid alternative, though these, of course, require you to spend money so may not be suitable for those trying to keep costs down.
Electronic Filament Splicer
Pros
No external heat source required
All-in-one solution
Easy to use
Cons
Expensive compared to DIY alternatives
No temperature regulation
An electronic filament splicer is an all-in-one solution that makes filament fusing extremely straightforward and reliable, producing near professional results, albeit at a price. It features a clamp to secure two filament ends, a power supply, and a built-in micro thermostatic heater that can reach up to 220°C (suitable for most filament types).
After heating up, the tool then fuses the two filaments together to create a strong, durable bond. It also comes with a handy timer and recommended heating times for different filament types. After the recommended heating time, turn off the device and let the filament cool for a few minutes.
A versatile tool designed for effortless filament welding, offering unparalleled ease of use for minimizing waste with durable, seamless joining.
It doesn’t appear to have a runaway temperature detector or have any way to regulate the temperature and the manufacturer recommends no longer than 4 minutes of heating, so be sure to turn it off to avoid issues. Gently squeeze the clamp to release the filament. You can then, optionally, smooth down the fusing area to remove any blemishes.
Some users report excellent blob-free results, while others recommend some after fusing work with sandpaper to smooth out occasional diameter issues. But, the general consensus is that users shouldn’t leave it on too long as it can pose a fire risk.
Mosaic Palette
Pros
High-end professional fusing and splicing tool
Automatic mid-print filament splicing
Multi-color and multi-material
Cons
Substantially more expensive than other fusing and splicing tools
Priced at $700, the Mosaic Palette means business and is aimed chiefly at those not just with deep pockets, but those that don’t want to compromise on quality and want a seamless fusing/splicing tool. It’s a high-end, professional fusing and splicing tool made from quality parts.
Rather than a very expensive way to fuse filament together, the Mosaic Palette is best described as an all-in-on filament management system. It feeds directly into your 3D printer, allowing you to swap between up to four different filaments on the fly (or 8 if you have the $900 to pick up the Pro version) for uninterrupted printing.

The Mosaic Palette 3 Pro is a high-end filament management system that enables on-the-fly switching between up to eight different filaments.
The filament is fed into the Mosaic Palette box, which is where the magic happens.It quickly splices, fuses, and cools filament as it leaves the splice core so that it’s ready to print. You can also mix and match not just colors, but also filament types, allowing you to pivot between flexible, durable, or even exotic filament types within the same print.
Another added benefit is that the automated filament management automatically splice to a different spool of the same filament types if ever you run out, removing the need to pause mid-print to change spools. This tends to improve the overall quality of prints and smoothes the whole printing process.
Owners report how easy it is to use the Mosaic Palette and heap praise on how it takes a lot of the hassle out of managing filament especially during complex or long prints. The price is a barrier, of course, so this is really only suited to those that print for commercial ends or to fuel a small business.
Why You Would Want To Fuse Filament Together
While we don’t fully recommend fusing 3D printer filament together (if done poorly it can easily cause jams and inconsistencies in your prints), sometimes it is necessary for one of two reasons:
1. You’re printing something big, that’s larger than the commonly available 1kg spools, and thus you may need to join the ends of two or more spools together to make a seamless transition for a really big print.
Although we might suggest printing in smaller sections and gluing together once finished. Fusing could cause a jam, and who wants to risk that on a large print? You can also buy larger 3kg spools.
2. Or you may just have quite a few samples of various colors and want to create a rainbow effect on your prints – which is a far more fun reason. At least you can experiment this way, to get a feel for how your extruder responds to fusing before risking a larger print.

Despite the risks involved, there are some techniques you can use to get an acceptably accurate join, that’s less likely to ruin your print. Here we’ll cover our 3 favorite methods, and afterward, let’s see if you can create something fun (or useful) from your leftover filaments!
Following this guide by no means guarantees you can print flawlessly with joined filament, but will significantly increase your chances of having a trouble-free print.
As each of these methods are ‘hacks’ – it’s likely you’ll get increasingly nicer results with practice.
Regardless of what you plan on making, I hope this article lets you create what you want to.
Whether you’re working on a large print, you want to make a specially colored print, or maybe you just want to join a load of filament samples together to create something unusual – please comment below with your thoughts and hopefully some pictures of what you create.
Related articles:
- How to use cleaning filament
- What you can use empty filament spools for
- Filament calculator: how many meters of filament on a spool
- How to untangle filament